

If a tree falls in the woods procrastinator actually accomplishes something quickly and no one is around to see it, does it still make a noise?
I am that tree. Er, procrastinator…. (You get the analogy.)
Let’s review: I said I was going to do something, got on it, and finished it…not just in the same decade year, but in well under a month!
Is that a first?!! (I can hear your stunned surprise and follow-up applause from here. Thank you, thank you. It’s the little things…)
You may recall when I finished the Living Room I declared that I had an actual, definite plan about what I want to do in my Dining Room and, therefore, I’m fairly certain I declared that the Dining Room was “next on my list.”
….which, of course, was the kiss of death.
No, I am not working on the Dining Room, and THAT is not where I used the fabric.
I used it in the Kitchen…. not on the windows, not to recover the wingback chairs. I did not use it in a box, I did not use it with a fox. I did not use it here or there. I used it on the toe-stub chair!
(Well, chairS to be precise. but making it plural would’ve wrecked the rhyme.)
If you’re new here, I used the fabric to recover the industrial-style barstools that I have in my kitchen,

Those toe-murdering chairs are still in our kitchen wreaking havoc with Mr’s feet…(although one might wonder why, after two years, he still finds their presence a surprise).
Anywho, the upholstered seats were not stain resistant, nor is anyone who lives here…so they have come to look a little like a Jackson Pollock painting:

WHICH, in DIY world might have been a very clever way to camouflage a wine spill.

I know grays/solids/whites are still the trend…but after last year’s “Where Bloggers Live” Kitchen round-up, I thought my kitchen looked boring and wanted some color. Plus, I’ve always thought it might be a cool juxtaposition to take a Toledo-style barstool, and upholster it with decorator fabric.
This might be a good time to say that I have a dream fabric that I would have L.O.V.E.D. to use for these chairs. But since we’re still wrestling with the self-imposed agony the chairs impart to Mr and his feet, the future of these chairs remains precarious. The dream fabric itself is spun from the shavings of ethically harvested unicorn horns, and hand printed with the tears of a phoenix… meaning, it’s a bank breaker for chairs you may not keep forever.
HENCE, I selected the bright, happy, wildly colored option I continue to share via this overused photo.

This was definitely a make-it-up-as-I-go-along project.
I knew recovering the seats would be snap. Unscrew the seats from the base, staple tightly pulled fabric right over the old fabric and, TA DA:

Let’s not forget that because I am, well, weirdly me, each seat had to feature the exact same motif selection from the fabric print so they would all be THE SAME.

But guess what! I gave myself permission to NOT obsess over the finishing details underneath! Do you care that when you look under the stools you won’t see a black disk of fabric covering the stapled raw edges? Of course you don’t, because I am not friends with weirdos.
So, knowing you wouldn’t care, I happily skipped that step and quickly knocked out the seats on 10 chairs. If you have backless barstools, this is a fun, relaxing, simple thing you can do to change up the look of your chairs. Seriously, it takes fabric, a stapler and about an hour or so. (Although using a pneumatic stapler is a huge time and hand saver.)

With the seat portions completed, it was time to turn my attention to the chairs with seat backs, which were a little more challenging: not I’ll-have-to-put-this off-for two-years challenging. Just, try-a-few-different-things challenging.
I was also free to be kind to myself, because the original upholstery on the seat backs were, IMHO, kind of sloppy and poorly fabricated; so any change would be a positive..

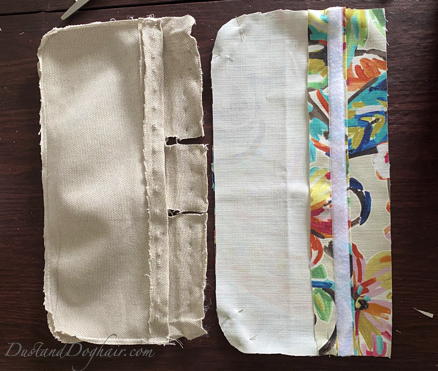
The backs had a flap sewn at the bottom, which concealed a row of staples that attached the fabric to the chair. The staples also ran through flaps of fabric from the front that wrapped through the supports and tucked under the back:

Carefully, I removed one of the seat back covers to see how the seat was constructed and likewise slid off the layer of padding:
.
After trying to insert a couple of staples, I decided NOT to duplicate their stapled approach and instead used velcro and made a very well fitted slip cover.
I used the original cover as a starting point for a pattern, added a 1/2-inch seam allowance and extra length that I could trim off later. I sewed a velcro strip where the line of staples used to be.
I also cut six matching front and six matching back sections, which you already knew I would. But it’s SEWWWW satisfying to see….(ouch, hope that bad pun didn’t trigger your gag reflex).

Next, I sewed the obsessively cut fronts to the obsessively cut backs, zig-zagged the edge for reinforcement, then lined up the bottom edges and made the cuts so the covers could go around the support posts. Or to those of you who don’t care, “Blah, blah, blah. Blah, blah, blah.”
Then I finished the edges of the bottom so the fabric would not unravel, especially when it was pulled tightly.

Granted it wasn’t beautiful sewing, but virtually none of it would show…it just needed to withstand pulling.
Finally, through trial and error, I determined where the other piece of velcro should go and sewed it to the face side of the fabric.

I left all the original covers on for a nice snug fit, placed the new covers over them and tugged, smoothed, tucked and tweaked until I was happy with them. I used a rare, highly technical tool for this part….you could use one, too, provided you have ample safety training:

Well…I got what I wanted: a lot of color. In retrospect, it might have been fun to use a contrast fabric on the seat backs….although if ever Mr develops collision avoidance skills, I will ABSOLUTELY go with the dream fabric. In the interim, here are the finished toe-stub, industrial style, DIY, colorfully upholstered, counter-height barstools. ( Do you think I crammed all the important keywords into that sentence?)

I’d like to tell you I have more plans for this room, but….well…Kiss of Death.. Instead, I’ll just show you more pictures:


_______

For the seat cushions, am I correct in believing there was no sewing involved…which means I might be able to do this, too!!?? Wow, you are amazing. The fabric you chose is GORGEOUS. Looks so pretty against the neutral rug. And you are so clever to figure out how to make the stool backs. I could dissect that thing and still be completely in the dark about how to replicate them. And they require sewing so obviously that is beyond my skill set. Love the Jackson Pollack reference. Our stool seat covers are museum worthy, too!! Grandbabies tend to do that to upholstery. God love them.
Ohh, I LOVE the fabric. All the lovely bright colors. I gotta tell you though, I wouldn’t have matched the pattern on each one – though it looks great.
Really brightens your kitchen. I do love bright colors.
Iris
It’s such a colorful pattern. It might have been a good idea to mix it up this time and not do repeats. But I’m never great about making those kind of choices (or any choices for that matter). Haha.
Thanks, Iris!
Seriously….I’m SO in love with that fabric. Can you get more and make me a dress? Or skirt? Or pants? Or anything that I could wear on my body!!!
How is it that Mr still stubs his toes?? I understand at first, just like with our Ikea bed with the drawers under it. We did that all the time. At First. But then you learn. Right?? Don’t tell him I said that. He won’t like me anymore (like he even knows about me anyways, LOL)
And you used your noggin wonderfully with the velcro. So much better that way.
BUT DID YOU SAY YOU USED YOUR TEETH as a sewing tool?? Em, Em, what am I going to do with you?? Ahhhhhhh, but it is good for your dentist. Trust me, those little cracks grow bigger over time. Just sayin’.
LOve ya, and love these,
XOXO
Jodie
http://www.jtouchofstyle.com
Haha, I knew I’d get you with that one! My grandmother actually had a little divot from where she would use her teeth to cut the thread. Hello? Scissors?! I am
much more discerning about how I use my teeth. I don’t want to cause damage by being careless with them!
We’ve decided Mr has a bifocal vision thing. He’s been tripping all week on concrete forms and stakes all around the yard.
Can’t get over how much the fabric reminds me of your artwork! I think of it all the time. I love dec fabric for clothing, although I haven’t sewn apparel in years.
Also, of course Mr knows about you! As do Bear, Doesch and my mom. I speak of you often.
Xoxo!
I absolutely love the colors in the material! How many inches was the repeat? Did you lose a lot of material doing it this way? I guess I always try to maximize the placement of the material in order to have extra—just in case of a mistake! HA! And I did notice the puppy play pen, is that the VERY big news??? Love getting your blog!
Yep! You guessed it. 🐾 She is unfortunately a very skilled climber, so I can’t rely on that anymore!
The fabric had a 27” half-drop repeat, and I ordered 6 yards. So I had a bit leftover. So glad you liked the colors…I tried to tint the pics, because it’s much softer to look at in real life!
Your last sentence = 🥰. Thank you! 😘